
GA4 event tracking helps businesses measure specific actions visitors take on a website, such as button clicks, form interactions, sign-ups, and other important activities. With Google Tag Manager, businesses can configure GA4 Event tags and triggers without repeatedly changing their website code. Google recommends previewing and testing events in Tag Manager before publishing changes and using Realtime or DebugView in Analytics to verify the data.
Google Tag Manager (GTM) helps you add tracking to a website without asking a developer to edit the site’s code every time you want to measure something new.
For example, you may want to know:
- How many people submit your contact form
- How many visitors click your phone number
- Which users click “Get a Quote”
- How many people download a brochure
- Whether visitors scroll through your service pages
- Which marketing channel brings genuine enquiries
GTM is the tool that helps you set up this tracking. Google Analytics 4 (GA4) is where you view the data afterward.
Think of it like this:
- Google Tag Manager = The control panel where you create tracking rules
- Google Analytics 4 = The dashboard where you see visitor activity and reports
- Tag = The tracking instruction you create
- Trigger = The condition that tells a tag when to run
- Event = A visitor action you want to record, such as a form submission or button click
What Is GA4 Event Tracking?: What You Need Before Starting
Before you begin, make sure you have:
- A Google account
- Access to your website’s CMS, theme files, or header/footer code
- A Google Analytics 4 property
- Permission to edit Google Tag Manager
- A cookie-consent banner or CMP if your business needs consent management for analytics or advertising cookies
- A list of the actions you want to track
For a normal service-business website, begin with these five essential events:
- Contact-form submissions
- Phone-number clicks
- WhatsApp clicks
- Email-address clicks
- Key CTA button clicks, such as “Get a Quote” or “Book a Consultation”
Do not begin by tracking every possible click. Start with actions that indicate genuine business interest.
Step 1: Create a GA4 Property
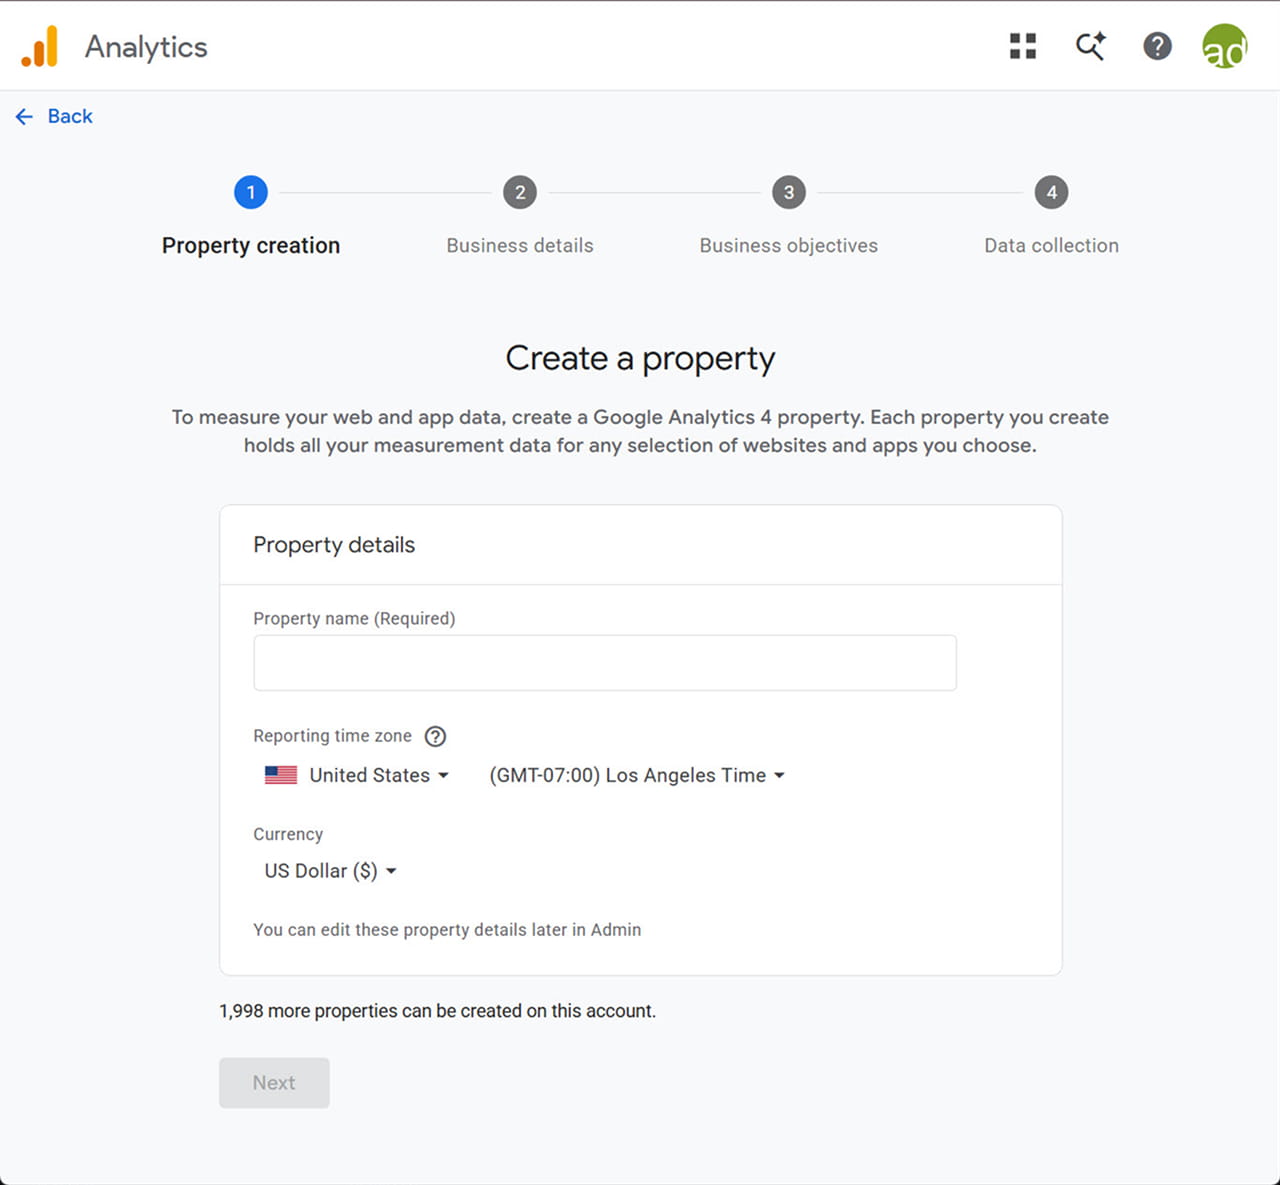
If you already have GA4, skip to Step 2.
- Go to analytics.google.com
- Sign in with your Google account
- Click Admin in the bottom-left corner
- Under the Account column, choose the correct account or create a new one
- Under the Property column, click Create Property
- Enter your business or website name
- Select your reporting time zone and currency
- Click Next
- Answer the business questions, then click Create
- Accept Google’s terms if prompted
Now you need to create a website data stream.
- In GA4 Admin, go to Data streams
- Click Add stream
- Select Web
- Enter your website URL, such as https://www.yourwebsite.com
- Give the stream a clear name, such as Main Website
- Click Create stream
You will now see a Measurement ID, usually beginning with G-, such as G-ABC123XYZ9.
Copy this ID. You will need it in GTM.
Step 2: Create Your GTM Account and Web Container
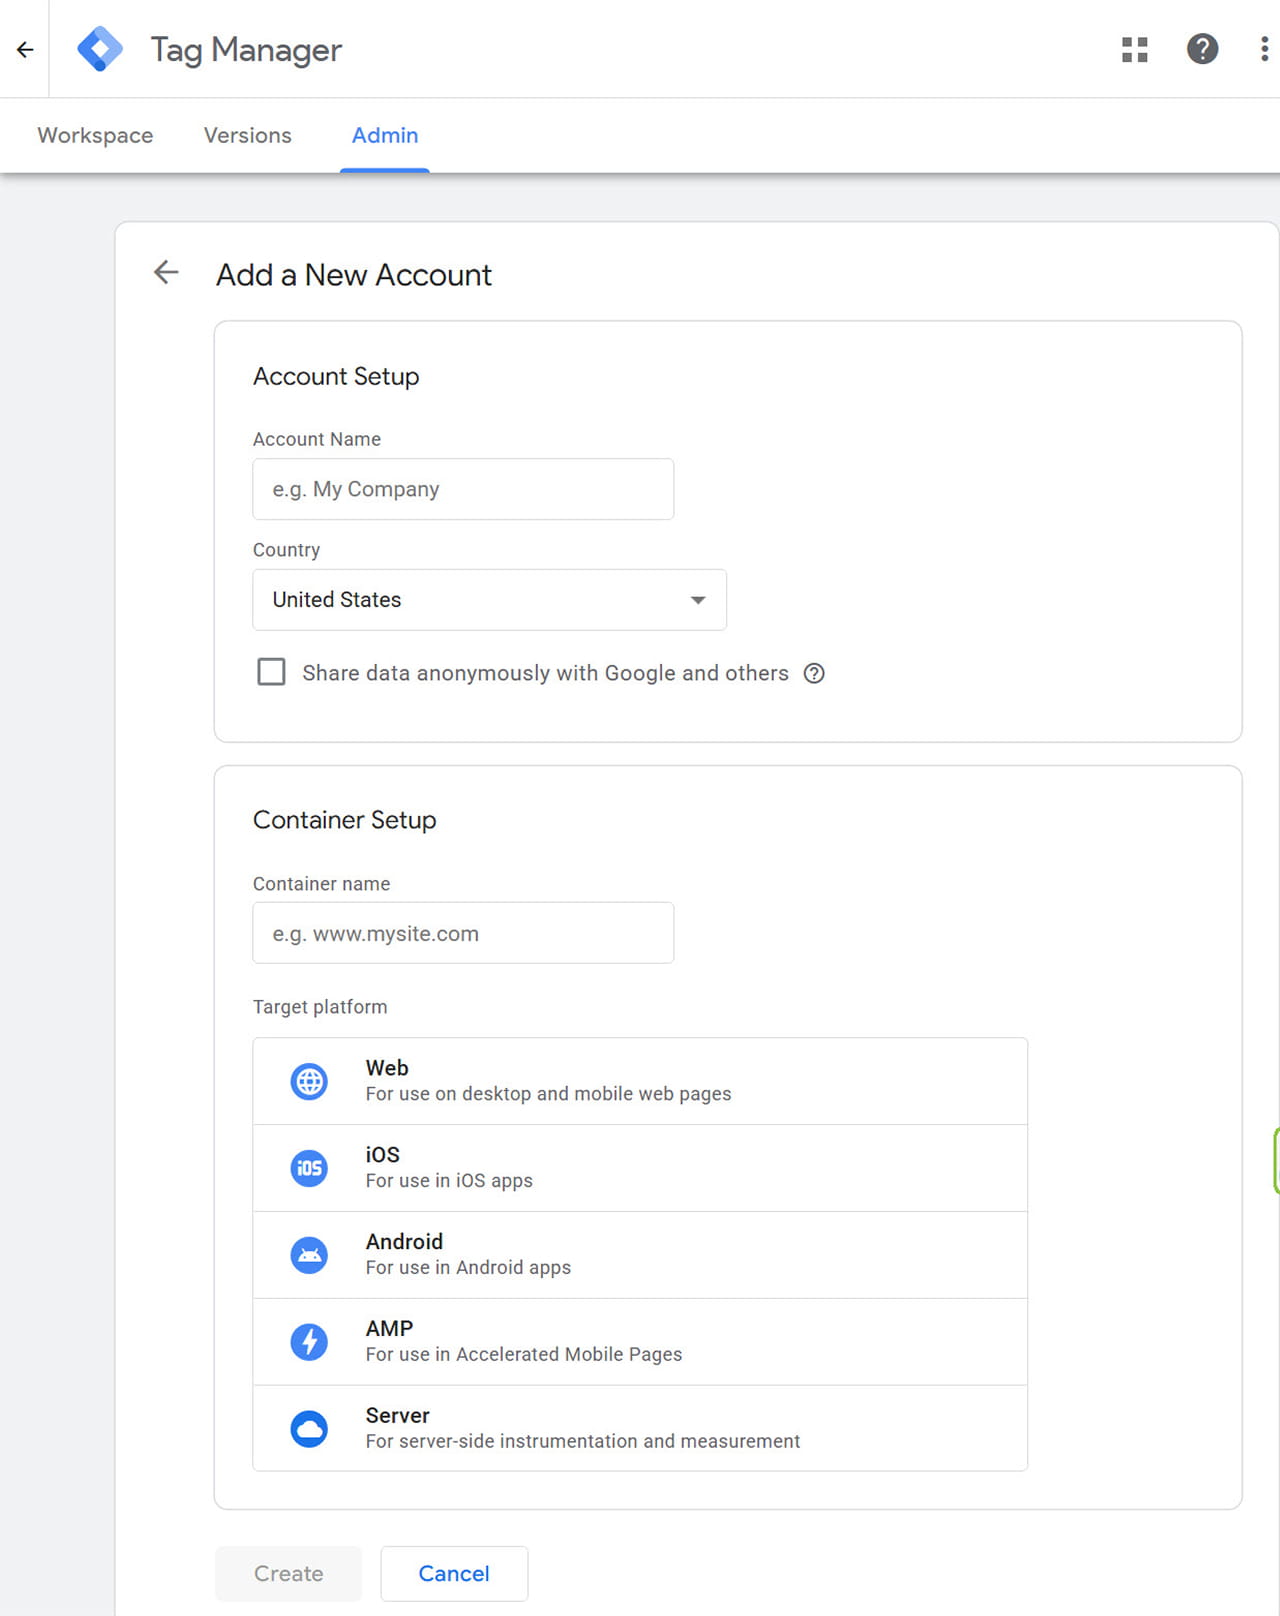
- Go to tagmanager.google.com
- Sign in using the same Google account if possible
- Click Create Account
- Enter your business name under Account Name
- Choose your country
- Under Container Name, enter your website name, such as Adroitte Website
- Under Target Platform, choose Web
- Click Create
- Read and accept the GTM terms of service
GTM will generate a Container ID that looks like this:
GTM-XXXXXXX
It will also show two code snippets. These snippets connect your website to GTM.
Step 3: Install GTM on Your Website
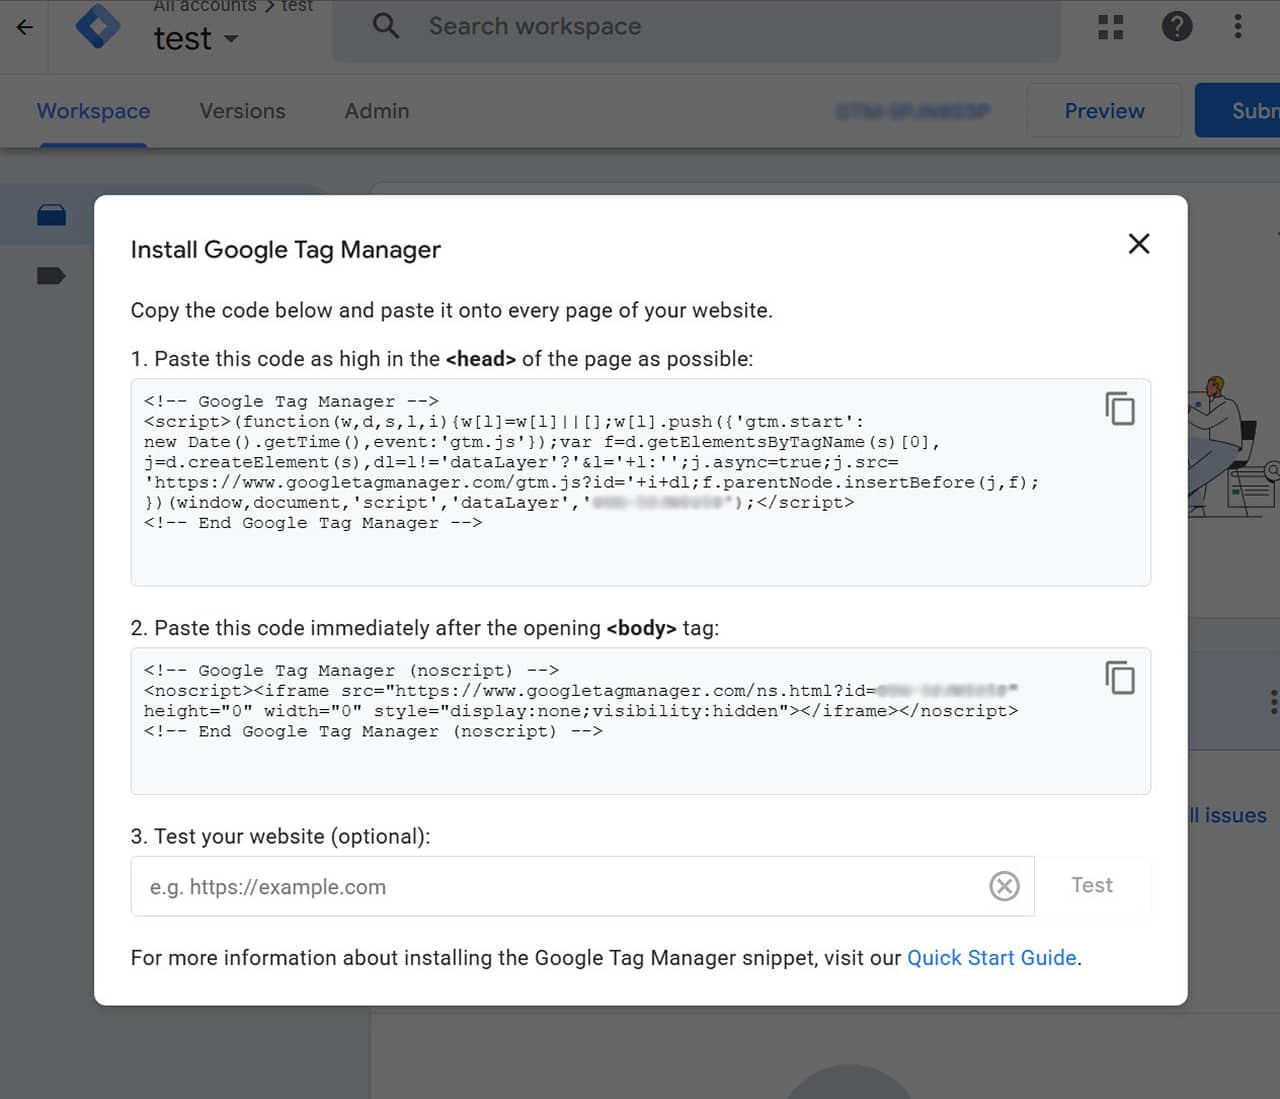
Google Tag Manager provides two pieces of code:
- One code snippet goes inside thesection of every page
- One code snippet goes immediately after the openingtag
Do not place both snippets in the same location.
If Your Website Uses WordPress
You have three common options:
- Ask your developer to add the GTM snippets to the site theme
- Use a trusted header-and-footer code plugin
- Use a GTM-specific WordPress plugin
If you use a plugin, enter only your GTM Container ID, such as GTM-XXXXXXX, if the plugin requests it. Do not add duplicate code manually as well, because duplicate installation can cause your events to be counted twice.
If Your Website Uses Shopify, Wix, Webflow, or Another CMS
Most CMS platforms have a place for custom code, global header code, analytics scripts, or tag-manager integration. Add the GTM snippets in the relevant global site-code area so they load across the full website.
If you are unsure, ask your website developer this exact question:
“Please install this Google Tag Manager container across all website pages, with the first snippet in the head and the second snippet immediately after the opening body tag.”
Step 4: Confirm That GTM Is Installed Correctly
Before creating tracking events, confirm that GTM is loading on your website.
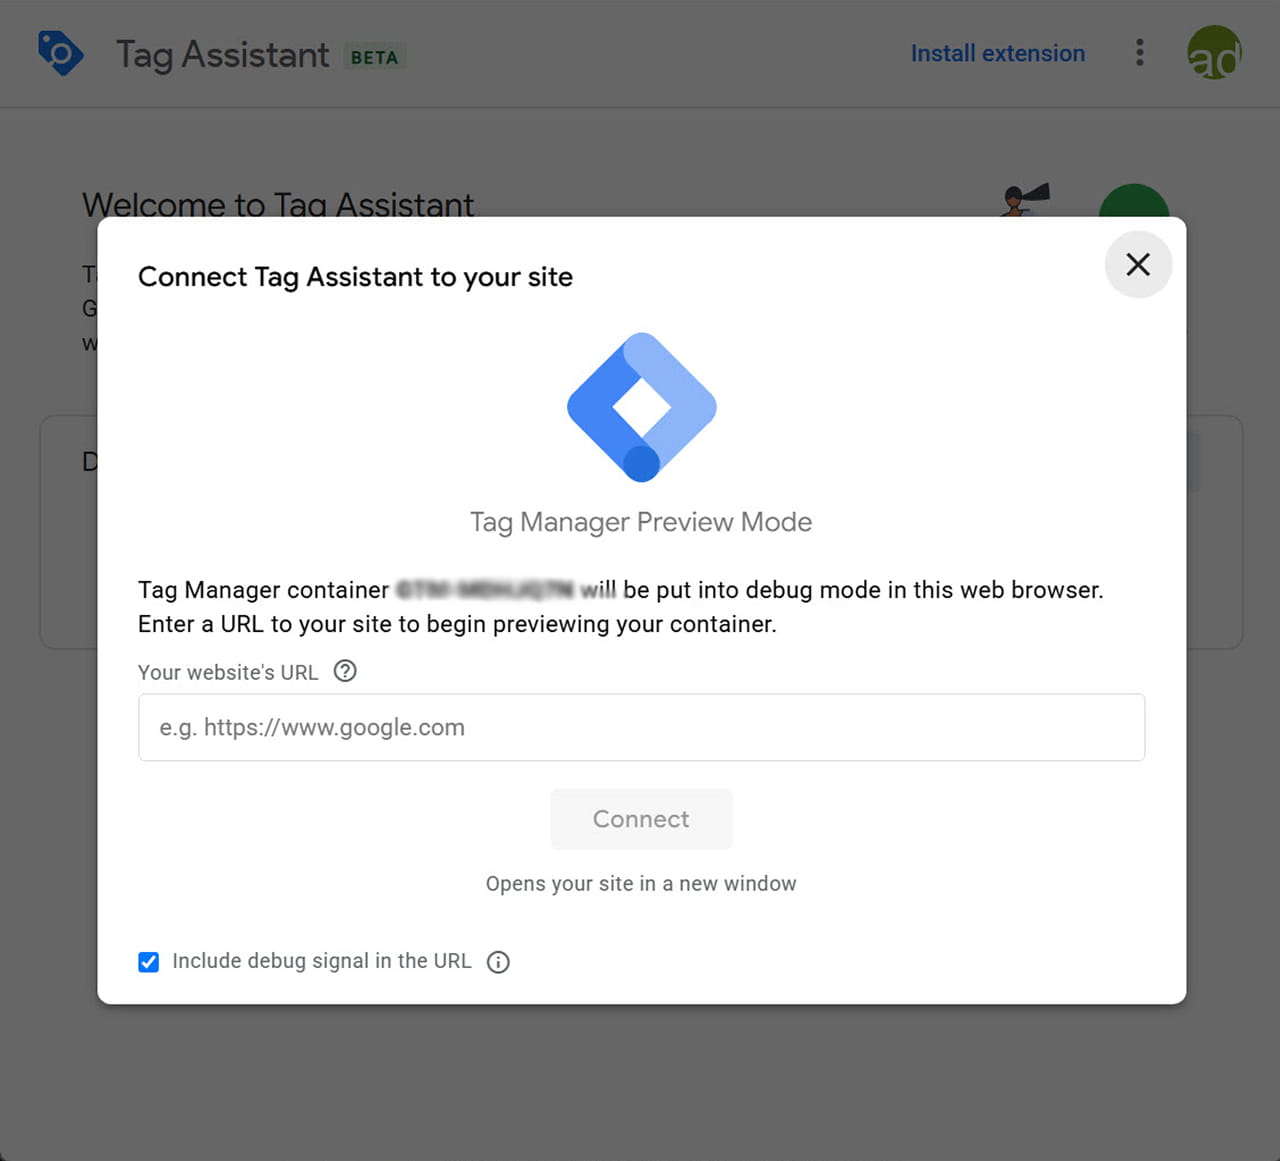
- Open Google Tag Manager
- Click Preview in the top-right corner
- Enter your website URL
- Click Connect
- Your website should open in a new tab
- Return to the Tag Assistant tab
If installation is successful, Tag Assistant should show that your GTM container is connected.
Preview mode lets you test tags before making them live, so use it every time you make tracking changes. Google confirms that Preview enables container debugging, while Submit creates and publishes a version.
Step 5: Create the Base Google Tag for GA4
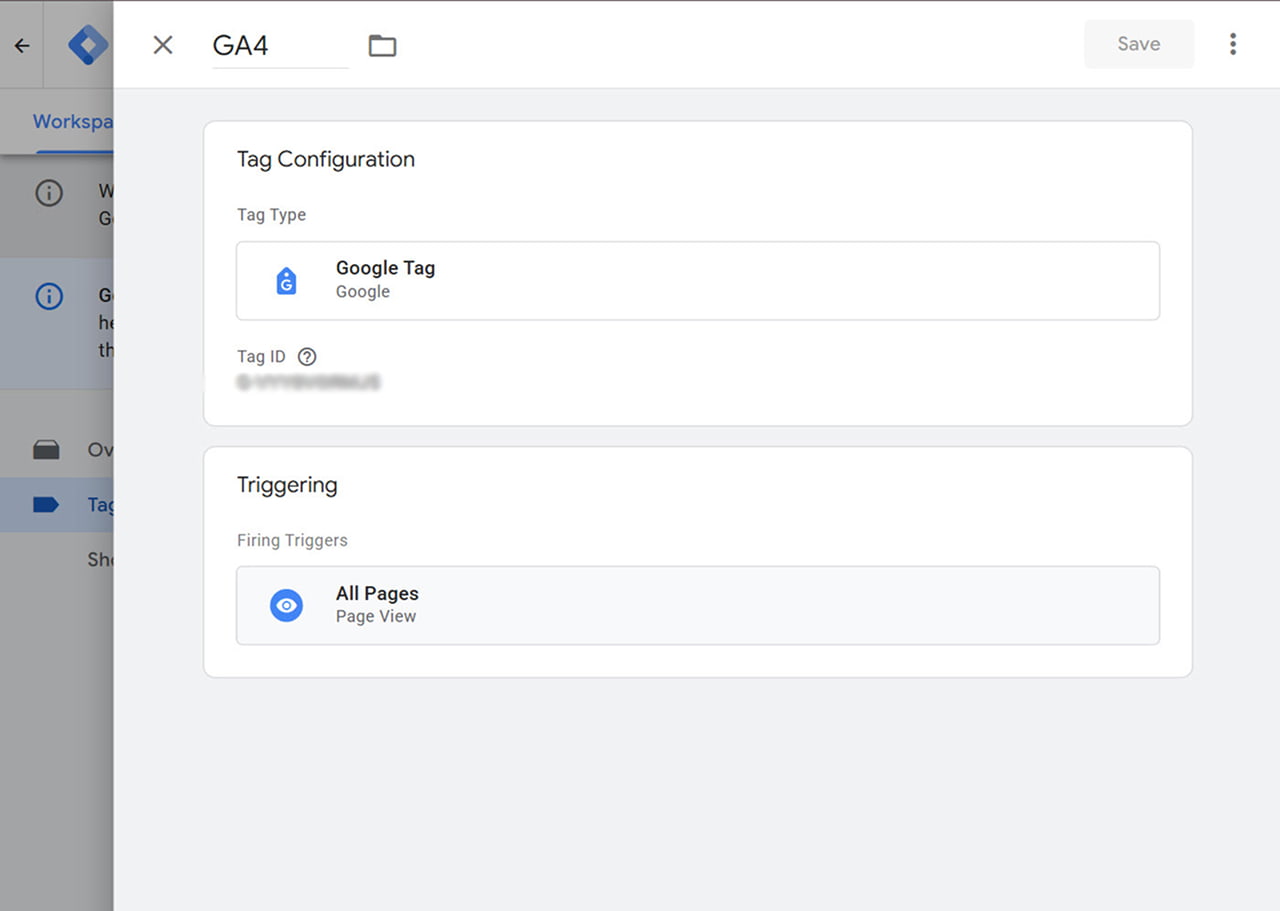
Older tutorials may tell you to create a “GA4 Configuration” tag. In the current GTM interface, use the Google tag instead. Google’s official setup guide instructs users to create a new tag, select Google tag, add the Tag ID, and choose an initialization trigger.
Follow these steps:
- In Google Tag Manager, click Tags in the left menu
- Click New
- Click the tag name at the top and rename it: Google Tag – GA4 Base Tracking
- Click Tag Configuration
- Select Google tag
- In the Tag ID field, paste your GA4 Measurement ID, such as G-ABC123XYZ9
- Click Triggering
- Choose Initialization – All Initialization Events
- Click Save
This tag loads GA4 across your website and provides the foundation for your future event tracking.
Step 6: Test Your Base GA4 Tag
Do not publish yet.
- In GTM, click Preview
- Connect to your website
- Visit a few pages on the site
- In Tag Assistant, look for your Google Tag – GA4 Base Tracking
- Confirm that it fires on each page
Next, check GA4:
- Go to analytics.google.com
- Open your GA4 property
- Click Reports
- Go to Realtime
- Open your website in another browser tab
- Browse one or two pages
You should see at least one active user in the Realtime report within a short time.
If you do not see activity, check that:
- The correct GA4 ID was entered
- The GTM code is installed on the website
- The base tag fires in Preview mode
- Your cookie-consent setup is not blocking analytics before consent
Step 7: Set Up Consent Mode
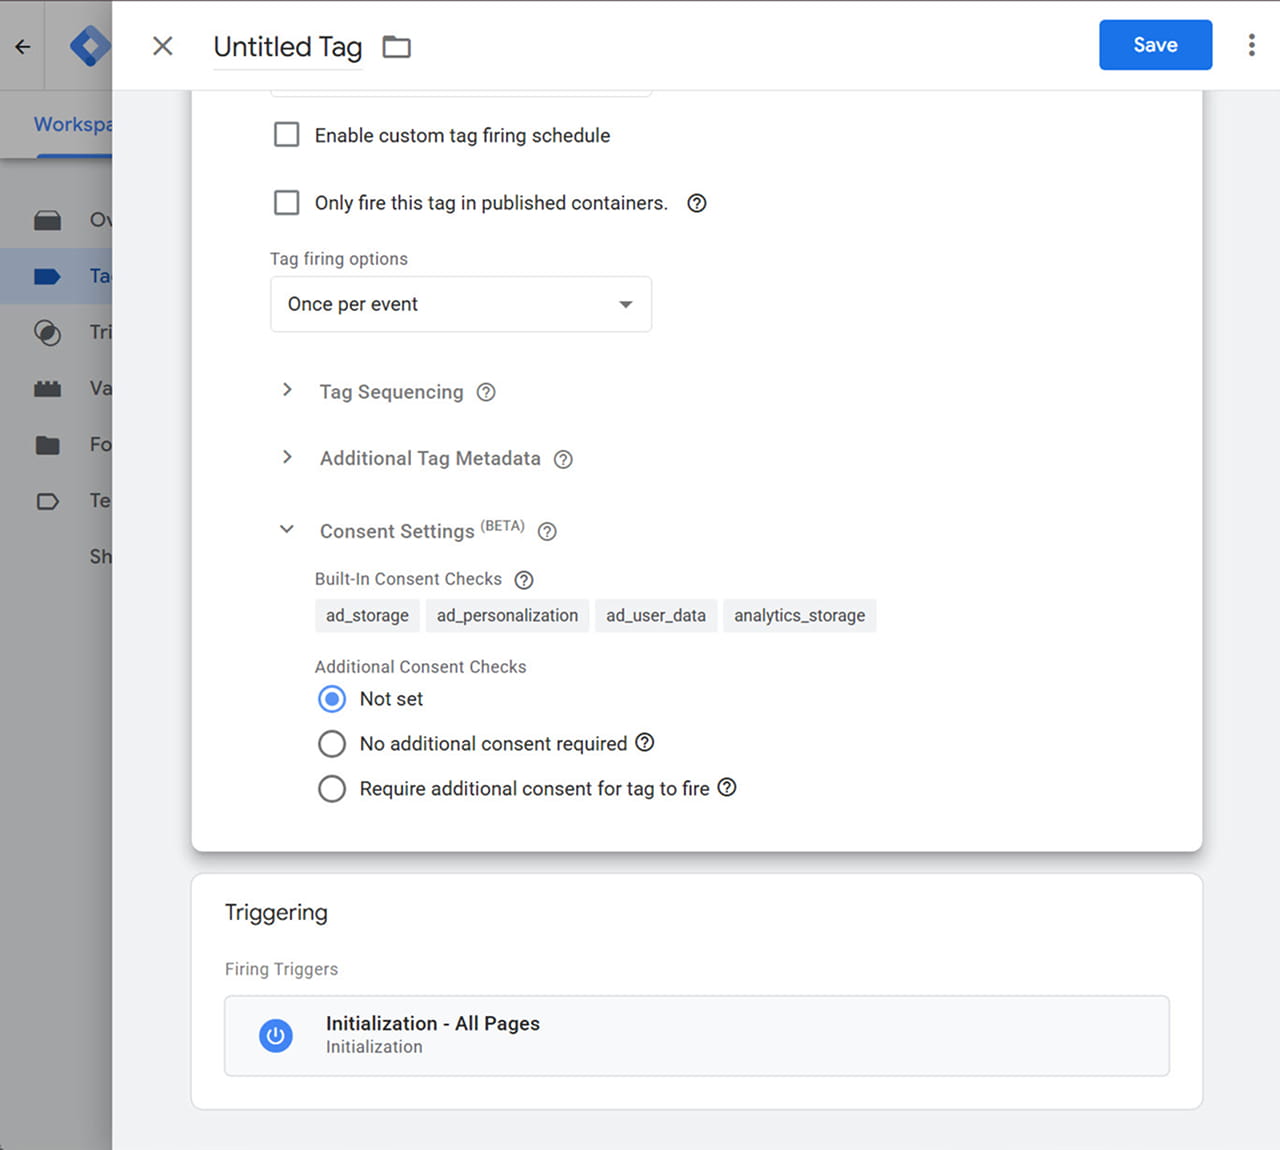
Consent Mode helps Google tags respond appropriately to a visitor’s cookie choices. It is especially important if you serve users in regions with privacy requirements, use GA4, run Google Ads, or use remarketing.
For a beginner, the easiest route is to use a cookie-consent platform that supports Google Consent Mode and GTM integration.
Your cookie banner should generally allow visitors to choose whether they accept:
- Necessary cookies
- Analytics cookies
- Advertising or marketing cookies
Do not publish analytics and advertising tracking without first checking how your cookie banner and consent settings are configured for your target regions. Consent setup can affect what data is collected and how conversions are measured.
Step 8: Turn On Built-In GTM Variables
Before tracking clicks, enable the variables GTM needs to understand what users clicked.
- In GTM, click Variables in the left menu
- Under Built-In Variables, click Configure
- Enable these click variables:
Click Element
Click Classes
Click ID
Click Target
Click Text
Click URL - Enable these form variables as well:
Form Classes
Form Element
Form ID
Form Target
Form URL
These variables help you create accurate triggers later.
For example, the Click URL variable helps you track a phone link, an email link, WhatsApp link, or PDF download link.
Step 9: Create an Event for Contact-Form Submissions
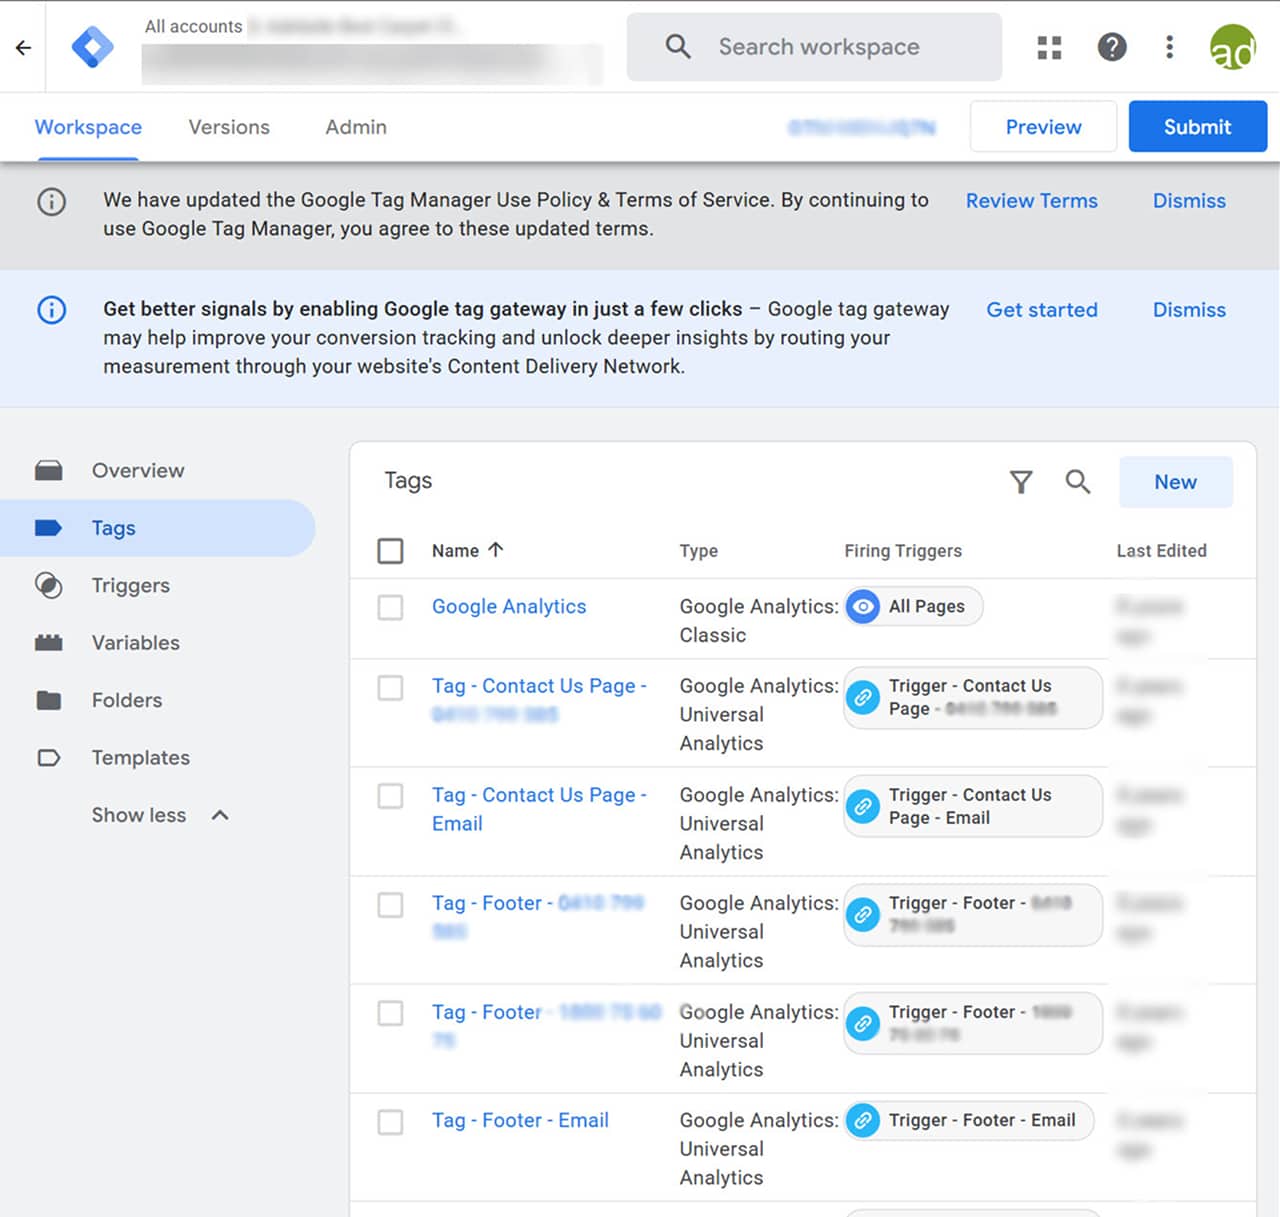
A contact-form submission is usually the most important event for a lead-generation website.
First, decide what should count as a successful submission. The most reliable option is a dedicated thank-you page, such as:
yourwebsite.com/thank-you/
When a visitor submits the form successfully, they are redirected to this page.
Create the trigger
- In GTM, click Triggers
- Click New
- Name it: Trigger – Contact Form Thank You Page
- Click Trigger Configuration
- Select Page View
- Choose Some Page Views
- Set the condition: Page Path → contains → /thank-you/
- Click Save
Create the GA4 event tag
- Go to Tags
- Click New
- Name the tag: GA4 Event – Generate Lead – Contact Form
- Click Tag Configuration
- Choose Google Analytics: GA4 Event
- Enter your GA4 Measurement ID if GTM asks for it
- Under Event Name, enter: generate_lead, Google recommends using predefined event names when they fit the action, and generate_lead is appropriate for a successful enquiry
- Under Event Parameters, click Add Event Parameter
- Add: Parameter Name Value, form_name Contact Form, lead_type Website enquiry, page_location {{Page URL}}
- Click Triggering
- Select Trigger – Contact Form Thank You Page
- Click Save
Test the event
- Click Preview in GTM
- Open your website through Tag Assistant
- Submit a test contact form
- Confirm that the event tag fires on the thank-you page
- Open GA4 and go to Admin
- Click DebugView or check Realtime
- Look for the generate_lead event
Only publish after the test works.
Step 10: Track Click-to-Call Phone Numbers
If your phone number is clickable, its link usually begins with tel:.
Example: tel:+911234567890
Create the trigger
- Go to Triggers
- Click New
- Name it: Trigger – Click to Call
- Click Trigger Configuration
- Select Just Links
- Select Some Link Clicks
- Set the condition: Click URL → starts with → tel:
- Click Save
Create the event tag
- Go to Tags
- Click New
- Name it: GA4 Event – Click to Call
- Select Google Analytics: GA4 Event
- Set Event Name to: contact
- Add these event parameters: Parameter Name Value, contact_method phone, link_url {{Click URL}}, page_location {{Page URL}}
- Under Triggering, select Trigger – Click to Call
- Click Save
Test this event in Preview mode by clicking your phone number from the website.
Step 11: Track WhatsApp Clicks
For most websites, WhatsApp links include one of these domains:
- wa.me
- api.whatsapp.com
- web.whatsapp.com
Create the trigger
- Go to Triggers
- Click New
- Name it: Trigger – WhatsApp Click
- Select Just Links
- Choose Some Link Clicks
- Use one of these conditions: Click URL → contains → wa.me Or: Click URL → contains → whatsapp.com
- Click Save
Create the event tag
- Go to Tags
- Click New
- Name it: GA4 Event – WhatsApp Click
- Select Google Analytics: GA4 Event
- Set the event name to: contact
- Add these parameters: Parameter Name Value, contact_method whatsapp, link_url {{Click URL}}, page_location {{Page URL}}
- Attach the Trigger – WhatsApp Click
- Save and test in Preview mode
Step 12: Track Email Clicks
Email links normally begin with mailto:.
Create the trigger
- Go to Triggers
- Click New
- Name it: Trigger – Email Click
- Select Just Links
- Choose Some Link Clicks
- Set the condition: Click URL → starts with → mailto:
- Save the trigger
Create the event tag
- Go to Tags
- Click New
- Name it: GA4 Event – Email Click
- Select Google Analytics: GA4 Event
- Set the event name to: contact
- Add parameters: Parameter Name Value, contact_method email, link_url {{Click URL}}, page_location {{Page URL}}
- Add Trigger – Email Click
- Save and test it
Step 13: Track Important CTA Button Clicks
A CTA is a button that asks visitors to take an action, such as:
- Get a Quote
- Book a Free Consultation
- Request a Proposal
- Start Your Project
- Speak to an Expert
Avoid tracking every button on the website. Track only the CTAs that matter to lead generation.
Find the button details
- Start GTM Preview mode
- Open the webpage containing the CTA
- Click the CTA button
- In Tag Assistant, select the click event
- Look at the Variables tab
- Note the values for:
– Click Text
– Click Classes
– Click ID
– Click URL
Use the most stable identifier. A unique Click ID is usually better than click text, because button text may change.
Create the trigger
- Go to Triggers
- Click New
- Name it: Trigger – CTA – Get a Quote
- Choose Click – All Elements or Just Links, depending on how the button is built
- Choose Some Clicks
- Add your condition, for example: Click Text → equals → Get a Quote Or, preferably: Click ID → equals → get-a-quote-button
- Save the trigger
Create the GA4 event tag
- Go to Tags
- Click New
- Name it: GA4 Event – CTA Click – Get a Quote
- Select Google Analytics: GA4 Event
- Set the event name to: select_content
- Add these event parameters: Parameter Name Value, content_type CTA button, item_name Get a Quote, page_location {{Page URL}}
- Add the CTA trigger
- Save and test
Step 14: Track PDF or Brochure Downloads
If visitors download a company profile, brochure, price list, or case study, track that action.
Create the trigger
- Go to Triggers
- Click New
- Name it: Trigger – PDF Download
- Choose Just Links
- Select Some Link Clicks
- Set the condition: Click URL → contains → .pdf
- Save the trigger
Create the event tag
- Go to Tags
- Click New
- Name it: GA4 Event – File Download – PDF
- Select Google Analytics: GA4 Event
- Set event name to: file_download
- Add these parameters:
Parameter Name Value
file_name {{Click Text}}
file_url {{Click URL}}
page_location {{Page URL}} - Attach the PDF-download trigger
- Save and test
Step 15: Mark Important Events as Conversions
In GA4, important business outcomes should be marked as key events. These are the events you want to treat as conversions for reporting and advertising measurement.
For most service businesses, mark these as key events:
- generate_lead
- A confirmed booking event
- A completed purchase event for e-commerce
- A qualified demo-request event
Do not automatically mark phone clicks, WhatsApp clicks, or every CTA click as key events unless those actions reliably represent a valuable lead. Otherwise, your conversion reports may look better than your real business results.
To mark an event as a key event:
- Open GA4
- Click Admin
- Go to Events
- Find your event, such as generate_lead
- Turn on Mark as key event
Step 16: Test Every Event Before Publishing
Before you publish, use GTM Preview mode and test each action yourself.
Your testing checklist:
- Submit each form
- Click the main CTA buttons
- Click phone-number links
- Click WhatsApp links
- Click email links
- Download a PDF
- Test on desktop and mobile
- Confirm the correct event appears in GA4 DebugView or Realtime
- Confirm the event does not fire more than once
GTM Preview mode is designed to show which tags fire and when, helping you identify incorrect triggers before they affect your live data.
Step 17: Publish Your GTM Container
Once all tests are successful:
- Return to Google Tag Manager
- Click Submit in the top-right corner
- Add a clear version name, such as:
GA4 Base Tag + Lead Tracking Events - Add a helpful description, such as:
Added GA4 base tracking, contact form submissions, phone clicks, WhatsApp clicks, email clicks, CTA clicks, and PDF downloads - Click Publish
GTM saves a version history each time you publish. This makes it easier to understand previous changes or restore an earlier version if a future setup causes a problem.
Recommended Event Naming
Use consistent naming from the beginning. This keeps GA4 reports clean and easier to understand.
| Website Action | Recommended Event Name | Example Parameters |
| Contact form submitted | generate_lead | form_name, lead_type |
| Phone number clicked | contact | contact_method: phone |
| WhatsApp clicked | contact | contact_method: whatsapp |
| Email clicked | contact | contact_method: email |
| CTA clicked | select_content | content_type, item_name |
| PDF downloaded | file_download | file_name, file_url |
| Consultation booked | generate_lead | lead_type: consultation |
| Purchase completed | purchase | transaction_id, value, currency |
Google recommends using its predefined event names where they accurately describe the user action, because those names are better aligned with GA4 reporting conventions.
Common GTM Mistakes to Avoid
- Installing GTM twice, which can double-count pageviews and events
- Publishing tags without testing them in Preview mode
- Using unclear names such as “Tag 1” or “Form Trigger”
- Tracking every small click instead of meaningful business actions
- Creating duplicate GA4 tags on the same website
- Measuring a form-button click rather than successful form submission
- Forgetting to check whether enquiry emails actually reach the business inbox
- Ignoring consent requirements for analytics and advertising tracking
- Making large changes without version names or notes
- Treating clicks as leads without checking whether they become genuine enquiries
Final Checklist
Before you finish, confirm that:
- GTM is installed once across the website
- GA4 is receiving page-view data
- Consent settings work correctly
- Contact-form submissions are tracked
- Phone, email, and WhatsApp clicks are tracked
- Primary CTA clicks are tracked
- Downloads are tracked where relevant
- Important events are marked as key events in GA4
- Every tag has been tested in Preview mode Your GTM container version has been named and published
A properly configured GTM setup turns your website into a measurable lead-generation asset. Instead of guessing which pages, campaigns, and CTAs work, you can use real visitor behavior to improve your SEO, advertising, landing pages, and sales process.
Ready to Turn Your Website Data Into Better Business Decisions?
A properly configured GA4 setup can give you clearer insights into how visitors interact with your website, which channels drive results, and where opportunities for improvement exist.
Reach out through our contact form and we’ll get back to you promptly. Let’s set up your analytics, conversion tracking, and reporting correctly so you can make smarter, data-driven decisions and get more value from your digital presence.